The Forest Cannot Continue Dedicated Server

The Forest
This item has been removed from the community because it violates Steam Community & Content Guidelines. It is only visible to you. If you believe your item has been removed by mistake, please contact Steam Support.
This item is incompatible with The Forest. Please see the instructions page for reasons why this item might not work within The Forest.
Current visibility: Hidden
This item will only be visible to you, admins, and anyone marked as a creator.
Current visibility: Friends-only
This item will only be visible in searches to you, your friends, and admins.

63 ratings

Troubleshooting The Forest Dedicated Server
Many admins are having serious issues launching or joining a dedicated server for The Forest. Many of them just give up after exhausting all possible solutions they find on the internet. However, if you check the The Forest's multiplayer dedicated server list in the game itself, you will find numerous servers listed that work just fine. So, what do the owners of these servers know that we don't know? I'm here to tell you just that. I have spent the last week trying dozens of server config file edits, port forwards, virtual machine installations and VPN environments to pinpoint issues with the dedicated server, and some of the solutions are very strange. But, they work, and that's all I care about.
Frequent Issues
Before I begin the guide, here are some top questions I see asked by people having trouble with the dedicated server:
- "My dedicated server only shows up in the Dedicated (LAN) list for me"
- For some reason, if you are on the same router network that your dedicated server is on (or it's on the same computer you are using to play the game), The Forest will put your server in the "LAN" list instead of the "Internet" list, even if the server is internet-facing. This isn't a problem since the server should still be accessible from the internet. Try asking a friend to search for your server in the Dedicated (Internet) list using the name filter. You can join your server by joining it in the LAN list.
- "I am getting an 'incorrect password' message when I try to join the server, even though my password is correct/there is no password"
- Make sure the number in steam_appid.txt is 242760 (see guide below), and your Server.cfg "serverSteamAccount" value is set with a Login Token from Steam's Server Account Management page (see guide below)
- "I am getting a 'server setup incorrectly' message when I try to join the server"
- The server is having trouble responding to player connection queries. This could be due to ports not being open, or the machine the server is on has more than one active internet connection open (this can happen if you have a VPN connected while you try to run your server)
- "My dedicated server isn't saving my players' inventories / I spent X in-game days finding loot for my character only to find that my character's inventory was reset the 2nd time I joined the server, and I started in the plane again"
- This is caused by the dedicated server not having a Login Token set in the Server.cfg file. Since players' character save files are given filenames based on the unique ID of the dedicated server they are linked to, dedicated servers with no identifying Login Tokens (a.k.a. "anonymous" servers) have trouble linking to save files on players' computers. Solution: put a Login Token in the Server.cfg file (see guide below)
- "All the crap I in my server that took me 7 hours to build is gone!"
- Solution: Restart the server.
Install & Configure the Server
After testing many different installation and configuration methods, the following is the one I settled on that offers guaranteed functionality (for me at least).
- Install The Forest Dedicated Server using Steam. It is located in the "Tools" section of your Steam Library.
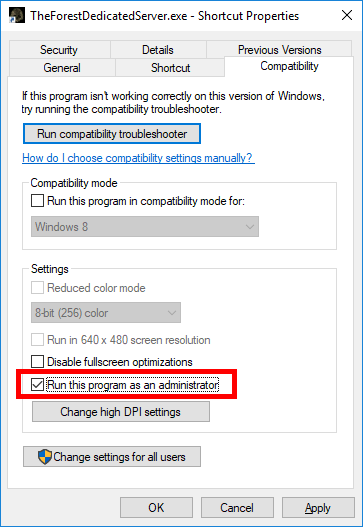
- Create a shortcut to TheForestDedicatedServer.exe, and open up the shortcut's properties. Make sure you only use this shortcut to launch the server from now on. The .exe is found at:
- [Your Steam Directory]\steamapps\common\TheForestDedicatedServer
- In the "Compatibility" tab, check the box for "Run this program as an administrator"
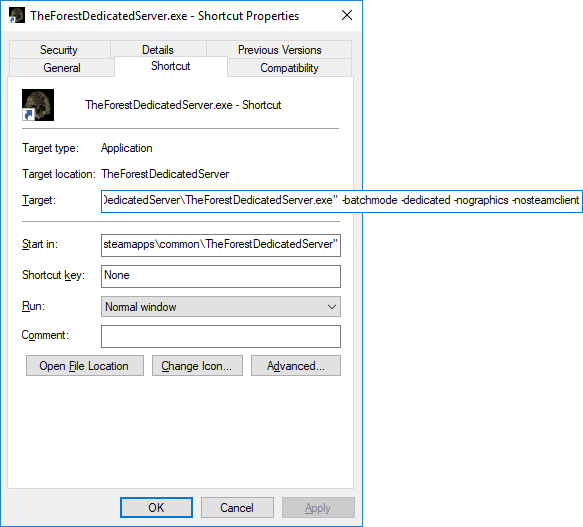
- In the "Shortcut" tab, add the following parameters to the "Target" text box (see screenshot):
- -batchmode -dedicated -nographics -nosteamclient
- Generate a Server Login Token at the Steam Game Server Account Management page, for use in the Server.cfg file. To do this, follow these steps:
- Go to https://steamcommunity.com/dev/managegameservers (login if you haven't already)
- Scroll down to the "Create a new game server account" section, and in the App ID box, enter in the App ID of The Forest client, which is 242760. DO NOT use the Dedicated Server App ID; I was never able to get my server working right using tokens generated from it. You can put anything into the "Memo" box.
- Click the "Create" button, and you should see your new Login Token (see screenshot)
- Copy/paste the Login Token into the value for "serverSteamAccount" in Server.cfg
- Go to https://steamcommunity.com/dev/managegameservers (login if you haven't already)
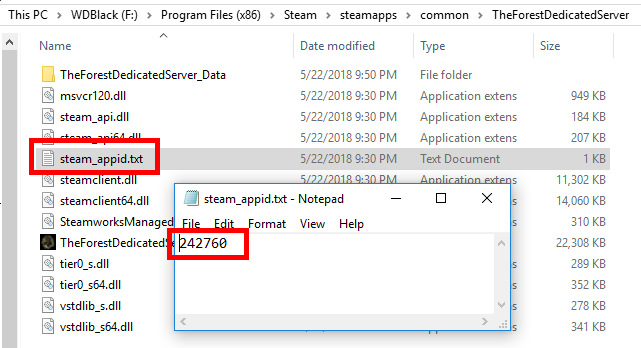
- After making a backup, change the number in steam_appid.txt (in the same folder as TheForestDedicatedServer.exe) to 242760 (The Forest client App ID) (see screenshot). Like in the previous step, I was never able to get my server working right using the actual dedicated server App ID.
- Configure the Server.cfg file (found in C:\Users\[Your Windows Account Name]\AppData\LocalLow\SKS\TheForestDedicatedServer\ds). Set showLogs to "on" to see any errors your server might have
- serverIP 192.168.1.47 <-- your computer's internal IP address, the same as the "IPv4 Address" number shown when you run "ipconfig" in a Windows command prompt
- serverSteamPort 8766 <-- don't change
- serverGamePort 27015 <-- don't change
- serverQueryPort 27016 <-- don't change
- serverName The Forest Game <-- the name of your game when listed in the server browser
- serverPlayers 4 <-- number of players that can join the game
- serverPassword <-- password that players have to enter to join the game
- serverPasswordAdmin <-- password that server admins must enter if they want to run admin commands while in-game
- serverSteamAccount <-- this allows you to attach the dedicated server to a Steam account. This is the "Login Token" that you created in Step 3
- serverAutoSaveInterval 30 <-- how often the server will save constructed buildings (not how often players' inventory is saved; players must do that on their own)
- difficulty Normal <-- self-explanatory
- initType Continue <-- whether or not players will be able to continue their game after leaving and re-joining. Highly recommended to leave at "Continue"
- slot 1 <-- save slot for the game (???, leave as is)
- showLogs on <-- enables a command window to run when you start the server that lets you see what is going on in the server, like errors, player connects/disconnects, game saves, etc. please turn this "on"
- serverContact email@gmail.com <-- tech support E-mail
- veganMode off <-- turn "on" to only disable enemies during the day time
- vegetarianMode off <-- turn "on" to disable enemies completely
- resetHolesMode off <-- turn "on" to reset all structure holes when loading a save (???)
- treeRegrowMode off <-- turn "on" to regrow 10% of cut down trees when you sleep
- allowBuildingDestruction on <-- turn "off" to make buildings invincible (cannot be destroyed)
- allowEnemiesCreativeMode off <-- turn "on" to allow enemies to spawn in creative mode
- allowCheats off <-- turn "on" to allow cheats
- saveFolderPath <-- specify a custom directory to save server state (highly recommend to leave blank)
- targetFpsIdle 5 <-- target FPS when no client is connected (I don't think this does anything if you run the game with the -nographics launch option)
- targetFpsActive 60 <-- target FPS when at least one client is connected (I don't think this does anything if you run the game with the -nographics launch option)
- serverIP 192.168.1.47 <-- your computer's internal IP address, the same as the "IPv4 Address" number shown when you run "ipconfig" in a Windows command prompt

Configure Your Internet
After your server is installed, you need to make sure people can find your server on the internet. This requires that you open certain internet ports to your server. Ports 27015 – 27030, 8766, and 80 (all both TCP/UDP) must be open to the machine hosting your server. They must all show as "open" on https://www.yougetsignal.com/tools/open-ports. These are the ports that allow players to query your server and see it displayed in the "Dedicated (Internet)" list in the game. If those ports are anything other than "open" on that Web site, then you must find where they are being blocked. The ports could be blocked at your ISP, your router, at Windows Firewall, or any combination of the three.
- Set a rule in Windows Firewall (or turn it off completely) to allow communication through ports 27015-27030, 8766, and 80 (all both TCP/UDP). If you want to just turn it off, instructions for that are here: https://www.lifewire.com/how-to-disable-the-windows-firewall-2624505
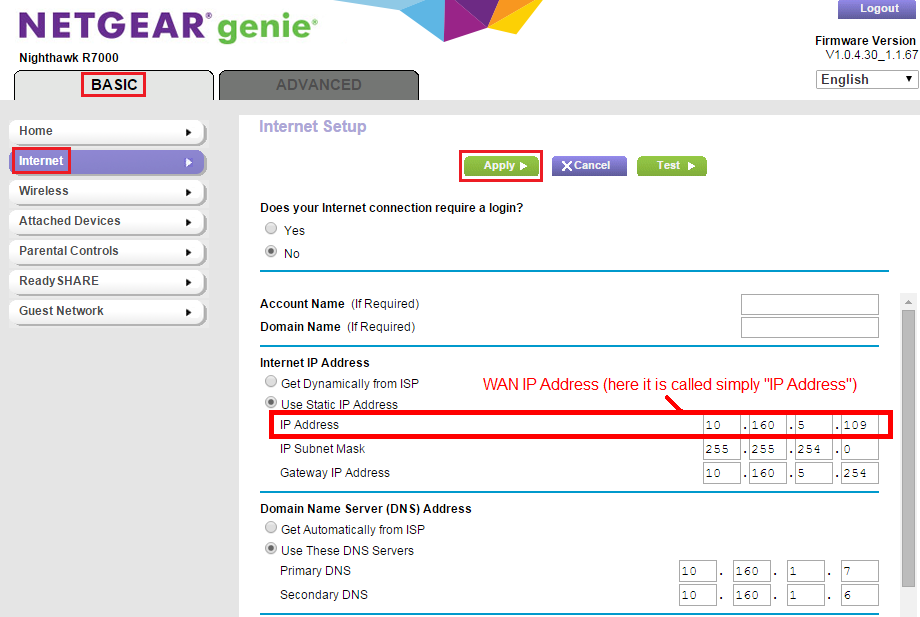
- Make sure your ISP isn't blocking the ports. To determine that, you must first know the WAN IP address given to you by your ISP, and whether it is a private or public IP.
- The location where you will find your WAN IP address depends on if you are behind a router or not.
- If your computer is connected to a router, then your WAN IP address will be found on that router's configuration page. The following are images of where you might find it:
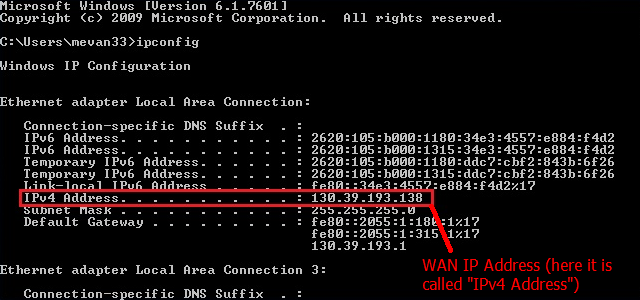
- If your computer is connected directly to a modem, then your WAN IP address will be listed next to the "IPv4 Address" entry for your internet adapter when you run "ipconfig" in a command prompt.
- If your computer is connected to a router, then your WAN IP address will be found on that router's configuration page. The following are images of where you might find it:
- If the first number segment in your WAN IP address is 10, 172, or 192 (like 10.10.43.10, 172.168.3.200, or 192.168.30.203), then your ISP has given you a private WAN IP address. Private WAN IPs usually have all their inbound ports closed (servers require them to be open), and the only hope for you is to run your server through a VPN (Virtual Private Network, discussed later in this guide), since obviously you do not have access to your ISP's configuration.
- If the first number segment in your WAN IP address is neither 10, 172, nor 192 (like 53.201.82.61), then congratulations, your ISP has given you a public IP address and you only have to worry about forwarding ports on your router (if your computer is connected to a router). If you are not behind a router and you have a public IP address, then you don't have to forward anything (although it is recommended you get a router anyway for security purposes)!
- The location where you will find your WAN IP address depends on if you are behind a router or not.


Use a VPN to get around Private WAN IP Addresses
**ONLY DO THIS IF YOUR ISP HAS GIVEN YOU A SHARED IP ADDRESS WHOSE PORTS YOU CANNOT OPEN DIRECTLY**
There is a way to get around ISP-blocked ports, and that is to host your server through a VPN (Virtual Private Network—this is NOT the same as a VPS) that gives you a Public IP Address. An example of one is LiquidVPN (if you are using them, connecting to a "Dynamic IP" server will give you a public IP) - https://www.liquidvpn.com/
A caveat to this is, is that if you host the server through a VPN, you are going to have to run the server on a virtual machine, since the server will not run right in an environment with two internet connections. The reason for this is that when your computer connects to a VPN, your computer now has two connections to the "internet": one through your actual network adapter, and one through a "virtual" VPN adapter (LiquidVPN uses OpenVPN and its "TAP-Windows Adapter V9" virtual adapter). Having two connections to the internet confuses the dedicated server and thus will cause problems for people trying to connect.
I have tested the following virtual machine set-up, and it works very well:
- Install VMWare Player (https://www.vmware.com/products/workstation-player.html)
- Create a virtual Windows machine with The Forest Dedicated Server on it, following all the steps at the beginning of this guide
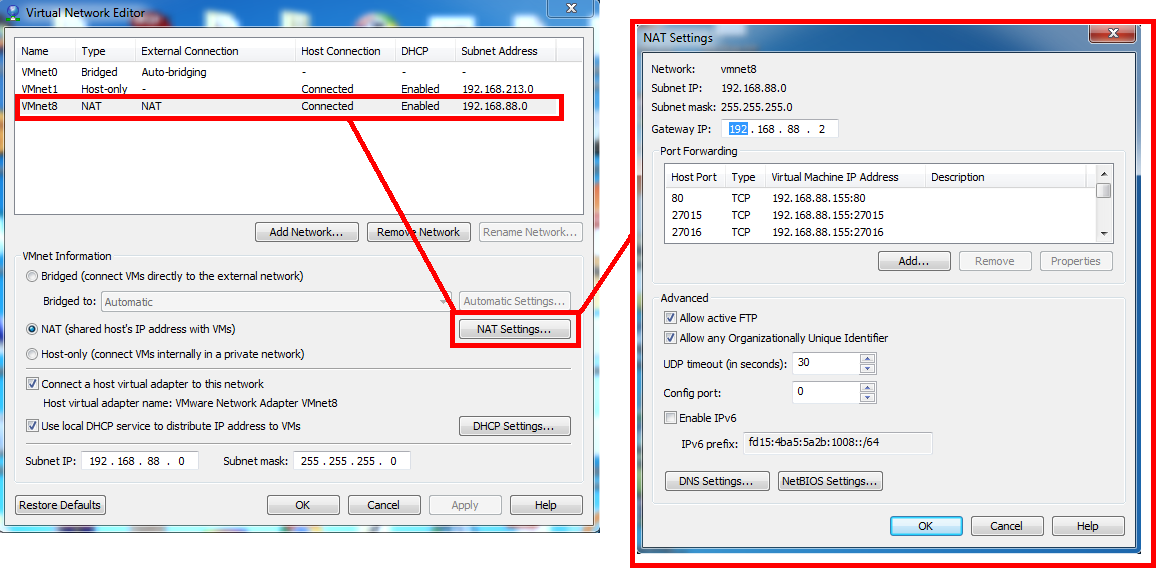
- Using vmnetcfg.exe, make sure the virtual machine's network adapter is in NAT mode, and forward ports 27015 – 27030, 8766, and 80 (all both TCP/UDP) to the machine's IP address (see screenshot). You may have to set a static IP to the virtual machine by editing vmnetdhcp.conf, so that you aren't constantly changing the IP that the ports are forwarded to. To see how to set a static IP to a virtual machine, go here: https://bytealmanac.wordpress.com/2012/07/02/assigning-a-static-ip-to-a-vmware-workstation-vm/ (VMWare's vmnetcfg.exe tool is for some reason not included in recent versions of VMWare Player. You can download it separately here: https://www.tobias-hartmann.net/2017/10/download-vmnetcfg-exe-fuer-vmware-workstation-14-x-player/).
- Connect to your VPN on the host machine, and obtain a public IP address
- Boot up the virtual Windows machine with The Forest Dedicated Server installed on it
- The virtual machine now thinks that it only has one internet connection, since it is consolidating the two internet connections from the host machine.
- From within the virtual machine, test that the ports 27015 – 27030, 8766, and 80 (all both TCP/UDP) are open by going to https://www.yougetsignal.com/tools/open-ports. If they aren't open, then either the VPN you connected to did not give you a public IP address, or you did not forward the virtual machine ports correctly using vmnetcfg.exe.
- Start up TheForestDedicatedServer.exe from within the virtual machine
Conclusion
I hope this guide works for you. If it does not, please let me know what issues you are still having in the comments. Thanks!
![]()
![]()
You need to sign in or create an account to do that.
Source: https://steamcommunity.com/sharedfiles/filedetails/?id=1396976933
0 Response to "The Forest Cannot Continue Dedicated Server"
Post a Comment